International Balls
Please Note:
Because all
bowlers have different positive axis points (PAP) your layouts may not
have the same appearance as the illustrations. Also the layouts are for
right-handed players. Remember to flip or rotate to produce
"mirror-image" for left-handed players.
BuzzSaw Drilling Layouts
Layout
1
For Higher Tracks & Short Pins |
Layout
2
Length & Control for high Revs |
Layout
3
Stacked - For Medium to Lower Revs |
Layout
4
Power with Control on THS |
Layout
5
Pin in palm - For Lower Tracks or More Oil |
Layout
6
Axis Leverage - Hole on Axis for Wet / Dry |
Layout
7
Full Roller |
Dynamo Drilling Instructions

Layout 1 - Label for Short Pins

Layout 2 - Power with Control on THS
Layout 3 - Stacked - For medium to Lower Revs

Layout 4 - Pin in Palm - For Lower Tracks, Early Roll, and
Wet/Dry
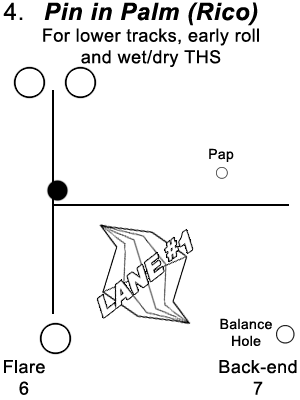 Great for Wet/Dry Lanes with Drier Backends!
- Produces less flare for increased stability and control!
- Creates less entry angle and a more predictable ball path
- Works well on 'Wet/Dry' both front-to-back side-to-side -
lane
conditions
- Good for Higher Rev Players
Layout 5 - Pro Pin High RG - Length for high Revs and Dry
Heads

Chainsaw Drilling Instructions

Layout 1 - Label 1:30 Pin
Layout 2 - Negative Pin Label
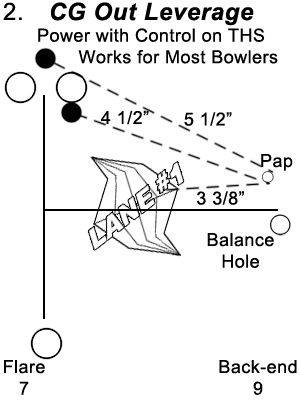
Layout 4 - CG Out Leverage
Layout 6 - Pro Pin CG Strong
Master Drilling
Layout
1
5-������¾" Pin to PAP |
Layout
2
4-������¼" Pin to PAP |
Layout
3
2-������¼" Pin to PAP |
Layout
4
4-������½" Pin to PAP, For Full Rollers |
Note:
For reaction
adjustments, consult the Ball Surface Reaction Guide. Be sure to check
for excess side weight and finger/thumb weight, as a balance hole may
be necessary for any of these layouts. If one is required, draw a line
from the center of the grip through the CG and extend to the PAL. This
will be the location of the balance hole.

Layout 1
- With this layout, we place the pin 5-������¾" from the PAP,
above the
finger holes, to produce length on drier conditions.
- Next we select a mass bias, MC������², position suitable for our
desired breakpoint shape.
- (A) Mass Bias in the ball track -
designed to
prodce a late and smooth breakpoint
- (B) Mass Bias in the Strong Position -
This
will produce an earlier and sharper breakpoint than position A.
-
Good for extreme entry angle!
- (C) Mass Bias on the PAL - produces
the
earliest breakpoint of the three positions while providing a
controllable and "readable" backend. - Works great on heavy
oil
patterns!
Layout 2
- With this layout, we place the pin 4-������¼" from the PAP. This
position will produce medium to high flare, great for players trying to
"open up" on a medium to heavy oil lane condition.
- For bowlers with medium to high rev rates, this in position
will
often produce the most overall hook throughout the entire lane.
- Now select an MC������² position:
- (A) Locate the Mass Bias halfway between the
ball track
and PAL - designed to produce a sharp breakpoint
- (B) Place the Mass Bias at the PAL
for an
easier, smoother, breakpoint.
- (C) Place the Mass Bias 2" past the PAL
for a
very heavy midlane roll on long oil patterns.
Layout 3
- With this layout, select a ball with a pin 3 - 4������½" out
from the
CG.
- Place the pin 2������¼" from the PAP.
- Locate the MC������² on the players ball track.
- Weigh the ball to ensure static balance is withing 1oz in
both
left/right and finger/thumb directions. For this particular layout we
will not use a balance hole.
- This layout will produce an early roll, a minimum amount of
flare
and works well for controlling conditions with dry backends.
Layout 4 - For Full Rollers
- For players who track between the fingers and thumb (full
rollers), place the major pin 4-������½" from the grip center in the
southwest direction.
- If a weight hole is necessary, be sure to locate it 6 ������¾
from the
grip center in the direction of either the major pin or MC������² pin.
Basic Drilling Instructions
Layout 1 - Label Drilling
- This layout is considered to be a standard "Label" drill
and will
produce good length with mild backend reaction.
- Place the center of gravity so as to balance ������½ oz.
positive and
finger.
- Rotate ball so that the pin (if applicable) is located at
1:30 in
relationship to the center of gravity.
- This layout will require no balance hole.
Layout 2 - Leverage Drilling
- This drill pattern is known as a "leverage" drilling. This
drilling provides medium length and maximum backend reaction.
- In this layout we place both the pin and center of gravity
3-3/8"
from the positive axis point.
- Most often this drill pattern will require a balance hole
to
remove excess side weight.
- Place the balance hole on the PAP and remove excess side
weight
down to ������½ ounce positive.
Layout 3 - Axis Weight Drilling
Note: Be sure to select a ball with less
than three
ounces of top weight!
- This drilling is referred to as "axis" weight. It provides
early
roll with a smooth, controllable backend.
- Place the center of gravity on the player's positive axis
point.
- Rotate the ball so that the pin is located on the line
between
the PAP and finger holes.
- Place the balance hole on the PAP and remove excess side
weight
to less than one ounce, This will ensure the balance of the ball is
withing USBC specifications.
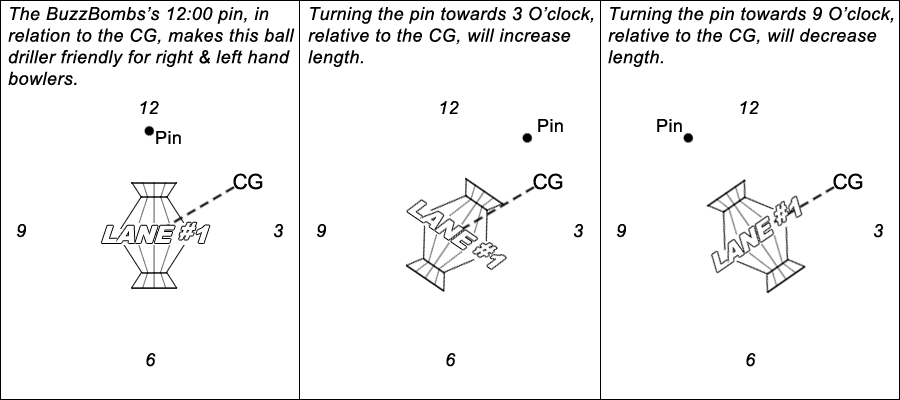
Lane #1 Drilling Instructions
- Positive side, finger, & top weight increase length
and back-end reaction.
- Negative side, thumb, and bottom weight decrease length and
back-end reaction.
- Axis holes decrease flare and back-end reaction.
- Pins closer in and under fingers decrease length.
- Pin-outs 3+" and over the fingers increase the length and
flip.
- If ending center of gravity is on your pin, CG or on the
same rotational plane as those, reaction is enhanced.

Pin Placement:
Zones 1/6 = low flare and weaker reaction
Zones 2/5 = medium flare and medium strength reaction
Zones 3/4 = high flare and strong reaction
As you move the PIN from 0" to 6 3/4" to your PAP, or from zone 1 to zone 6 with your pin placement, you raise the RG of the core. As you get closer to zone 1, the RG is lowered.
Moving the PIN to your PAP results in the ball revving up the quickest. Moving the pin to 6 3/4" from your PAP will result in the ball revving up the slowest.